
How to Use Google Docs to Boost Your Book Writing Productivity
- Shawndra Holmberg

- Apr 18, 2024
- 5 min read
Updated: Apr 19, 2024
Before you start writing your book—learn your writing tool!
If you’ve already started writing… wait for it… learn your writing tool!
NOTE: Google Docs is NOT a tool to use for formatting your manuscript. However, the best tool for writing is the one you know and can use now.
Topics to boost your book writing productivity
Page Break
DO NOT hit Enter multiple times to get the chapter on the next page. Add a page break.
Use the keyboard shortcut.
Ctrl+Enter for PC
Cmd-Enter or Cmd-Return for Mac
Find
Use the keyboard shortcut.
Ctrl+F for PC
Press Cmd-F for Mac
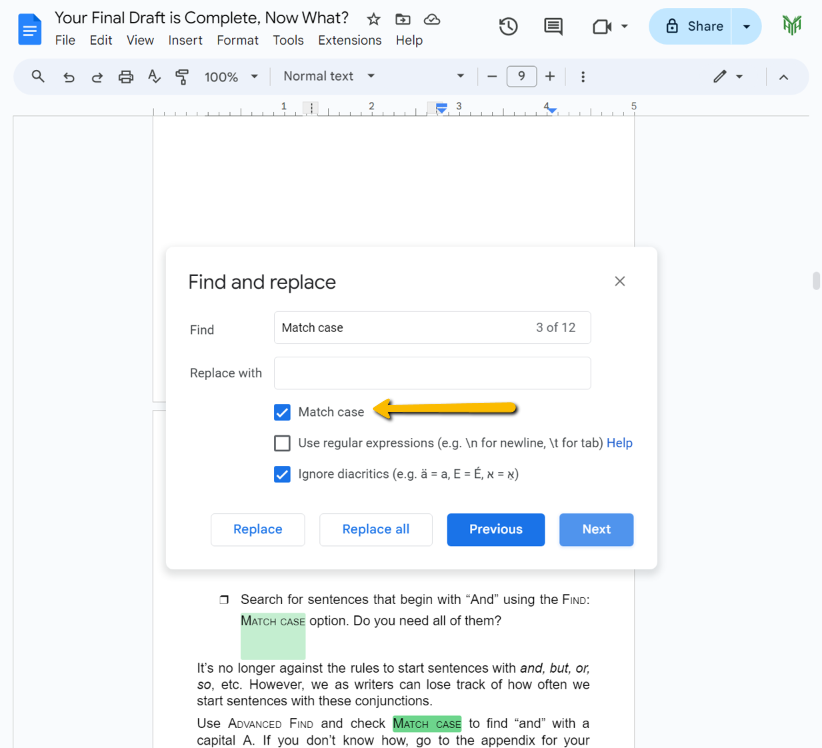
Find and Replace
Click EDIT in the menu at the top.
Click FIND AND REPLACE.

Enter what you’re looking for in FIND and add what you want to replace it with in the REPLACE WITH box.
You can then choose to REPLACE ALL or search for instances and REPLACE one at a time.
Advanced Find: Match Case
Search for words that are capitalized (or not) using the FIND AND REPLACE window above.
Check the box next to MATCH CASE.
Paste Without Formatting
If you want to copy text from one document, paste it into another document and change the format (font, size, etc.) to match the formatting of the document you're pasting it into, use Paste without formatting.
Use the keyboard shortcut
Ctrl+Shift+V for PC
Press Cmd-Shift-V for Mac
Use PASTE WITHOUT FORMATTING.
Click EDIT in the menu at the top.
Click PASTE WITHOUT FORMATTING.

Add Page Numbers
Page numbers provide a reference point for you, your editor, or anyone reviewing your manuscript. Add them!
Click INSERT in the menu at the top.
Click # PAGE NUMBERS.
Choose whether your pages numbers are in the Header or Footer.

The page number justification defaults to right justification, which is fine for a document, but you might want it centered for your book. You may prefer to have the page numbers on the outside margin which means your even pages are on the left and your odd pages are on the right.
Open the Footer (or Header) by double clicking.
If you want the page numbers Centered:
highlight the page number and
choose center alignment on the menu.

If you want the page numbers on the Outside:
click OPTIONS (right side),
click FOOTER FORMAT
check the box next to DIFFERENT ODD & EVEN,
hit APPLY,
highlight the page number on the odd page and choose right alignment, and
highlight the page number on an even page and choose left alignment.

But before you spend time trying to decide the “perfect” placement, remember, you’re not formatting your manuscript, you're just providing reference points.
Set Your Styles
Setting your styles before you begin writing allows you to make universal changes with a few clicks of a button. The styles you set are not written in stone, but having clear divisions of chapters, sections, and subsections makes editing easier. Varying fonts and styles help the reader (your editor) identify the levels of information and their relationship to the rest. Formatting changes are also much easier when you’ve set your Styles.
In Google Docs you'll find your Styles on the toolbar. It will probably show “Normal text” or “Heading…” As you mouse over the menu items, you’ll see a label pop up called Styles. You can either accept the default styles or modify.
To modify Styles...
Highlight the text you want.
Format the text. Change the font, font size, bold, italics, etc.
Click on the down arrow next to the Styles box.
Mouse over the Style you want to update.
Choose UPDATE ... TO MATCH.

If you want to use your new Styles on all your documents, go to Options and set SAVE AS MY DEFAULT STYLES.
Google Docs Styles are not as flexible as Styles in Word, but then, you're not using Google Docs to format your manuscript, only to write it.
Add Section Breaks
Section breaks allow you to create different formatting for individual sections. Use SECTION BREAK (NEXT PAGE) to add different chapter titles as headers, remove the header on the chapter's title page, and change the page numbering format for certain sections.
Add a Section Break at the end of each chapter.
• Click INSERT on the menu.
• Click BREAK.
• Choose SECTION BREAK (NEXT PAGE).

If you want to change the formatting for only a portion of a page, such as adding columns, use SECTION BREAK (CONTINUOUS).
Create your Headers
Open the Header of your document by double clicking inside the Header area (the top and center of the page is a good point).
Click on OPTIONS on the right.
Check the box next to DIFFERENT ODD & EVEN.
Click APPLY.
Adding Chapter Titles
Place your mouse on the first odd page of the chapter section.
Add the chapter title.
Go to the next section.
Uncheck the box next to LINK TO PREVIOUS.
Add the chapter title for this section.
Repeat for each section.
Add the Book Title
Place your mouse on an even page and type in the title of your book.
Keep the LINK TO PREVIOUS box checked.
According to book format experts, headers on Chapter Title pages are not correct. However, you’ll see some traditionally published books have them. Decide where you put your effort at this point.
If you want to delete the header on the Chapter Title page, check the box next to Different first page in the header.
NOTE: It’s common to have the book and chapter titles in the Header; that’s why this section is called Create your Headers. However, your titles can be in the Footer as I’ve done for this book. For your manuscript, I recommend sticking with Headers and letting your formatter decide where to place the titles for the best reading experience.
Add a Table of Contents (TOC)
NOTE: You need to have used your Heading 1 Style for your Chapter Titles. Turn back to Setting Your Styles if you haven’t already done that.
Place your cursor where you want your Table of Contents to be.
Go to INSERT on the menu bar.
Mouse over TABLE OF CONTENTS.
Choose a Table.

Show Non-printing Characters
Sometimes you want to see the paragraph and page breaks as well as tabs and spaces in your manuscript. Any time your formatting isn't working the way you want, check these non-printing characters. They may be messing with you.
Click VIEW in the menu.
Check SHOW NON-PRINTING CHARACTERS.

Learning how to use Google Docs (assuming it's your tool of choice for writing) will boost your book writing productivity.

Congratulations on conquering the blank page and completing your first draft!
As an author, your primary aim is to ensure your readers can fully engage
with your message without distractions. Now that your initial draft is done,
it’s time to embark on the editing journey.

